|
|
| (56 intermediate revisions by the same user not shown) |
| Line 1: |
Line 1: |
| = '''<span style="color:#00528c">Prerequisites </span>''' = | | === Adding ThoysBot to CasperLet === |
| === Terminology ===
| |
| ---- | | ---- |
| : '''Parcel'''<br />A distinct, continuous (undivided) portion or tract of land.
| | {| class="wikitable" |
| | | |- |
| : '''Tenant'''<br />a person or group that rents and occupies land, a house, an office, or the like, from another for a period of time. The tenant is the customer of the landlord. | | ! style="white-space: nowrap; background: #33CCFF; border: 2px solid #383838;" | Steps to perform |
| | | ! style="white-space: nowrap; background: #33CCFF; border: 2px solid #383838;" | Reference Image |
| : '''Landlord'''<br />You, the CasperLet account holder and land owner.
| | |- |
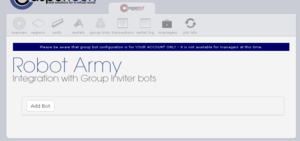
| | | | valign="top" | Log in to CasperLet, go to the '''[https://let.casperdns.com/groups.php Group Bots]''' page and click the '''"Add New"''' button. <br /><br />(If you already have existing bots set up, you will see a list of bots under the "Add New" button - if you wish to edit an existing bot configuration, click the "Edit" button next to the name of the bot you want to edit instead.) |
| : '''Manager'''<br />The people that help the landlord manage rentals.
| | | [[File:Robot Army 2016 - 01.png|300px|thumb|left|Click for larger image]] |
| | | |- |
| = '''<span style="color:#00528c">Your Account</span>''' =
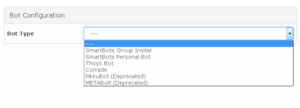
| | | valign="top" | Use the pulldown to select your bot type. |
| No, you cannot (currently) use your CasperVend account username/password if you have one - CasperVend and CasperLet are using two different logins.
| | | [[File:RobotArmy-BotChoices.png|300px|thumb|left|Click for larger image]] |
| | | |- |
| See '''[[CasperVend_2/Password_Reset#Creating_Your_CasperDNS.com_Account | how to create (or reset) your CasperDNS Account.]]'''
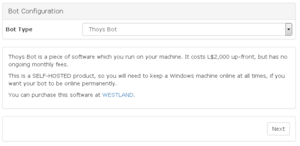
| | | valign="top" |You will be presented with information about:<ol><li> The bot type you've chosen </li> <li>Where to purchase the bot in question (in case you don't have it already).</li></ol> |
| | | These screen assumes your choice is ThoysBot. |
| = '''<span style="color:#00528c">About The Units</span>''' =
| | | [[File:RobotArmy-Thoys.png|300px|thumb|left|Thoys bot info]] |
| === Note on New Units ===
| | |- |
| ----
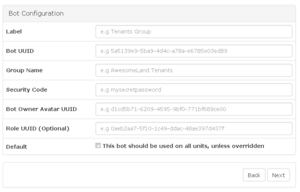
| | | valign="top" | If you have selected '''Thoys bot''' you'll see this screen. Remember that: <br /><ol><li>'''Label''' = Display name of that bot as you want it to appear in your bots list.</li></ol><br />Once you are done entering in setup information, click the "Next" button. If you've missed information that is required, there will be a popup screen to tell you what you're missing when you click "Next". |
| [[File:Price_Adjustment.png|300px|thumb|left|Click to see larger image]]<br /> <br /><br /> <br /><br /> <br /> | | | [[File:RobotArmy-ThoysSetup.png|300px|thumb|left|Click for larger image]] |
| | | |- |
| As you can see in this image, when you click "change" to change the rental price, you will also get an additional option:
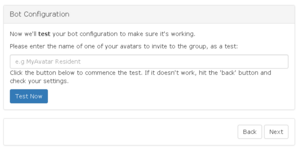
| | | valign="top" | Now you will arrive at the test screen. Click the blue '''"Test Now"''' button to begin testing the configuration. |
| ''Adjust time remaining on unit appropriately''
| | | [[File:Robot Army 2016 - 05.png|300px|thumb|left|Click for larger image]] |
| | | |- |
| Most landlords will want to '''leave this UNchecked/UNticked''' when setting out a brand new rental unit.
| | | valign="top" | You will get a "Please Wait" window while the test is in progress, as shown here. |
| | | | [[File:Robot Army 2016 - 06.png|300px|thumb|left|Click for larger image]] |
| === Debit Permissions ===
| | |- |
| ----
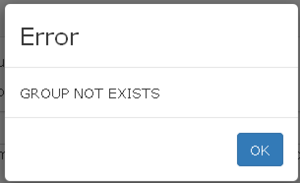
| | | valign="top" | If you have an error in your bot configuration, you'll get an additonal popup with the error message. <br /> <br />This is a '''sample''' of what the error message popup will say - there will be different errors depending on the configuration issue, and the selected bot. |
| See the page on '''[[Debit_Permissions | Debit Permissions]]''' to understand why these are necessary.
| | | [[File:RobotArmy2016 - ErrorSample.png|300px|thumb|left|Click for larger image]] |
| | | |- |
| === Placing Units ===
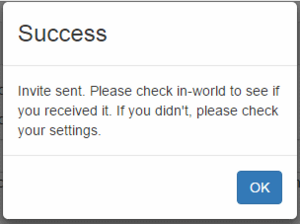
| | | valign="top" | If the test of your configuration was a success, you will see this message. |
| ----
| | | [[File:RobotArmy2016 - Success.png|300px|thumb|left|Click for larger image]] |
| If you are an estate manager on the sim/region or the owner of the group that owns the mainland parcels you will be able to rez objects on the land even if the rights are otherwise turned off. When placing rental units, it's '''always''' a good idea to turn on "view land owners" and/or "view property lines" to make sure you are placing the unit in an area where scripts will always work, and the renter will not be able to return it. Most residents will behave in this regard, but there's '''always''' going to be someone who will want to test the estate staff. | | |- |
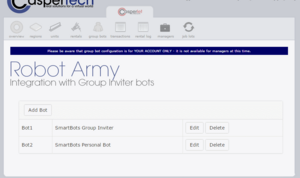
| | | | valign="top" | Clicking '''"OK"''' on the Success screen will automatically take you back to the main bots page, with your newly configured bot appearing in the list. <br /><br /> An '''example''' of a list of bots may be seen in this image. |
| ==== How does a unit know which parcel to track? ==== | | | [[File:RobotArmy2016 - BotList.png|300px|thumb|left|Click for larger image]] |
| ---- | | |} |
| When you are renting parcels on a sim, simply rez the rental unit ON the parcel you want it connected to.
| |
| | |
| Then you can move it off the parcel onto land where the renter can't return the rental unit, or move it to your sim's rental HQ.
| |
| | |
| === Difference Between Meters and Boxes? ===
| |
| ----
| |
| | |
| Both types allow rental state changes - showing whether a unit is available, rented, etc. - but where the box includes transparency functions, the meter does not because it's designed to be left out and visible at all times. As far as tenants are concerned, there are no functional differences between the boxes and the meters. Both will accept payments, both will show state changes.
| |
| | |
| Each type comes in a primary/master version, and a secondary/slave version that acts as a relay. You '''cannot''' use a "slave" unit in place of a primary unit - the "slave" units have no "brains" of their own, and exist solely to pass commands and responses back and forth from the primary unit it is linked to.
| |
| | |
| The primary/master unit names are as follows:
| |
| | |
| CasperLet Rental Box
| |
| CasperLet Rental Meter
| |
| CasperLet Mesh Rental Meter
| |
| | |
| The secondary/slave unit names are as follows:
| |
| | |
| CasperLet SLAVE Box
| |
| CasperLet SLAVE Meter
| |
| | |
| = '''<span style="color:#00528c">Customising Your Rental Units</span>''' = | |
| To create your custom rental units AND to make sure rental state changes are reflected (or not, as you choose) between rented and available states, see the '''[[CasperLet/Customisation | Rental customisation]]''' page.
| |
| | |
| = '''<span style="color:#00528c">Configuring Your Units</span>''' =
| |
| :* If all of your rental units will use the same base configuration, follow the instructions in '''[[#Bulk_Setup | "bulk setup"]]''' section.
| |
| :* If SOME of your rental units will use the same base config, but you will have SOME units with different settings, use the '''[[#Bulk_.2B_Individual_Setup | "Bulk + individual setup"]]''' section.
| |
| :* If all of your rental units will use different configurations, use the '''[[#Individual_Unit_Setup | "individual setup"]]''' section below.
| |
| | |
| === Setup Limitation ===
| |
| ----
| |
| Currently CasperLet does not support rental profiles. If you have '''two''' or more "base configuration sets" (that are dependent on the rental), you will still need to choose '''one''' as the default, and change the rest individually - this will be using the '''[[#Bulk_.2B_Individual_Setup | bulk + individual]]''' section below.
| |
| | |
| A suggestion ticket '''is''' in the queue to add rental profile functionality.
| |
| | |
| === Pay Buttons ===
| |
| ----
| |
| To understand what goes in the pay buttons in the different unit configurations, see the '''[[CasperLet/Pay_Buttons | Pay Buttons]]''' page.
| |
| | |
| == '''<span style="color:#00528c">Bulk Setup</span>''' ==
| |
| === 1) Unpack your CasperLet shipping crate ===
| |
| ----
| |
| : ''If you're curious, you can see a list of '''[[CasperLet/Introduction | what's in the box]]''' with links to explain some of the included tools. ''
| |
| | |
| === 2) Rez one (non-"slave") rental unit PER RENTAL ===
| |
| ----
| |
| : ''If the tenant will be taking OWNERSHIP of the parcel (such as with land sales on an island estate), the rental unit must NOT be rezzed on the parcel to which they take ownership. As a side-effect, this means the prim-counting feature will not function.''
| |
| | |
| : ''If the landlord is retaining ownership of the parcel that the tenant is renting (such as with vending events or shopping malls), the rental unit should be ON the parcel.''
| |
| | |
| : The object names of the primary/master units to use are as follows:
| |
| ''CasperLet Rental Box ''
| |
| ''CasperLet Rental Meter''
| |
| ''CasperLet Mesh Rental Meter''
| |
| | |
| : ''Units with "slave" in the name are strictly a command '''relay''' object. They do not store settings '''at all''', and you cannot use them in place of a primary/master unit.
| |
| | |
| ==== ''Rez the unit ON the parcel to be tracked''' ====
| |
| ----
| |
| This is how CasperLet picks up the UUID of the parcel in order to keep tabs on it. It doesn't have to stay there, once it registers the parcel, it can be moved off to a sidewalk or rental office.
| |
| | |
| ==== ''Manager handling your setup?'' ====
| |
| ----
| |
| ''Rez out all the units that are needed - or drag-copy as many as you need - '''NOW''' before the configuration process begins!
| |
| | |
| === 3) Grant debit permissions ===
| |
| ----
| |
| : ''See the '''[[Debit_Permissions | debit permissions]]''' page to details of what these are and why they should be granted.''
| |
| | |
| : <span style="color:#F00;">''NOTE: If you are re-rezzing a copy of a unit you've already granted permissions for, you won't see another debit perms popup. This is normal. ''</span>
| |
| | |
| === 4) Recognize rented state changes? ===
| |
| ----
| |
| : ''Follow the instructions on the '''[[CasperLet/Customisation#Showing_Rental_State_Changes_Automatically | CasperLet customisation page]]''' to make sure they STILL change once you're done with configuration. If you make changes without following these instructions, rental units will not change between rented and available states. ''
| |
| | |
| === 5) Go to CasperLet website and log in ===
| |
| ----
| |
| : ''Click one of your rental units, select "config" from the popup menu, use that link to go to the website, and log in.''
| |
| | |
| === 6) Set your bulk settings ===
| |
| ----
| |
| : ''Go to the '''[https://let.casperdns.com/units.php Units]''' page when logged in, and set your options. Remember to click "SAVE" anytime you have a "save" option on a setting, and then use the "save" button at the BOTTOM of the bulk page as well.
| |
| | |
| : ''This means change only ONE option at a time, and when you have a "save" button for that option, click "save" once it's set!''
| |
| | |
| == '''<span style="color:#00528c">Bulk + Individual Setup</span>''' ==
| |
| === 1) Unpack your CasperLet shipping crate ===
| |
| ----
| |
| : ''If you're curious, you can see a list of '''[[CasperLet/Introduction | what's in the box]]''' with links to explain some of the included tools. ''
| |
| | |
| === 2) Rez one (non-"slave") rental unit PER RENTAL ===
| |
| ----
| |
| : ''If the tenant will be taking OWNERSHIP of the parcel (such as with land sales on an island estate), the rental unit must NOT be rezzed on the parcel to which they take ownership. As a side-effect, this means the prim-counting feature will not function.''
| |
| | |
| : ''If the landlord is retaining ownership of the parcel that the tenant is renting (such as with vending events or shopping malls), the rental unit should be ON the parcel.''
| |
| | |
| : The object names of the primary/master units to use are as follows:
| |
| ''CasperLet Rental Box ''
| |
| ''CasperLet Rental Meter''
| |
| ''CasperLet Mesh Rental Meter''
| |
| | |
| : ''Units with "slave" in the name are strictly a command '''relay''' object. They do not store settings '''at all''', and you cannot use them in place of a primary/master unit.
| |
| | |
| ==== ''Rez the unit ON the parcel to be tracked''' ====
| |
| ----
| |
| This is how CasperLet picks up the UUID of the parcel in order to keep tabs on it. It doesn't have to stay there, once it registers the parcel, it can be moved off to a sidewalk or rental office.
| |
| | |
| ==== ''Manager handling your setup?'' ====
| |
| ----
| |
| ''Rez out all the units that are needed - or drag-copy as many as you need - '''NOW''' before the configuration process begins!
| |
| | |
| === 3) Grant debit permissions ===
| |
| ----
| |
| : ''See the '''[[Debit_Permissions | debit permissions]]''' page to details of what these are and why they should be granted.''
| |
| | |
| : <span style="color:#F00;">''NOTE: If you are re-rezzing a copy of a unit you've already granted permissions for, you won't see another debit perms popup. This is normal. ''</span>
| |
| | |
| === 4) Recognize rented state changes? ===
| |
| ----
| |
| : ''Follow the instructions on the '''[[CasperLet/Customisation#Showing_Rental_State_Changes_Automatically | CasperLet customisation page]]''' to make sure they STILL change once you're done with configuration. If you make changes without following these instructions, rental units will not change between rented and available states. ''
| |
| | |
| === 5) Go to CasperLet website and log in ===
| |
| ----
| |
| : ''Click one of your rental units, select "config" from the popup menu, use that link to go to the website, and log in.''
| |
| | |
| === 6) Set your bulk settings ===
| |
| ----
| |
| : ''Go to the '''[https://let.casperdns.com/units.php Units]''' page when logged in, and set your options. Remember to click "SAVE" anytime you have a "save" option on a setting, and then use the "save" button at the BOTTOM of the bulk page as well.
| |
| | |
| : ''This means change only ONE option at a time, and when you have a "save" button for that option, click "save" once it's set!''
| |
| | |
| === 7) Set your different individual settings ===
| |
| ----
| |
| : ''For '''each''' unit you want different from your base defaults, you will need to:
| |
| ::# Click that specific unit
| |
| ::# Select "config" from the popup menu
| |
| ::# Arrive at the individual unit's configuration page
| |
| ::# Make your changes
| |
| ::# Remember to click "save" for each option with a "save" button
| |
| ::# Remember to click "save" at the bottom when done
| |
| | |
| == '''<span style="color:#00528c">Individual Unit Setup</span>''' ==
| |
| === 1) Unpack your CasperLet shipping crate ===
| |
| ----
| |
| : ''If you're curious, you can see a list of '''[[CasperLet/Introduction | what's in the box]]''' with links to explain some of the included tools. ''
| |
| | |
| === 2) Rez one (non-"slave") rental unit PER RENTAL ===
| |
| ----
| |
| : ''If the tenant will be taking OWNERSHIP of the parcel (such as with land sales on an island estate), the rental unit must NOT be rezzed on the parcel to which they take ownership. As a side-effect, this means the prim-counting feature will not function.''
| |
| | |
| : ''If the landlord is retaining ownership of the parcel that the tenant is renting (such as with vending events or shopping malls), the rental unit should be ON the parcel.''
| |
| | |
| : The object names of the primary/master units to use are as follows:
| |
| ''CasperLet Rental Box ''
| |
| ''CasperLet Rental Meter''
| |
| ''CasperLet Mesh Rental Meter''
| |
| | |
| : ''Units with "slave" in the name are strictly a command '''relay''' object. They do not store settings '''at all''', and you cannot use them in place of a primary/master unit.
| |
| | |
| ==== ''Rez the unit ON the parcel to be tracked''' ====
| |
| ----
| |
| This is how CasperLet picks up the UUID of the parcel in order to keep tabs on it. It doesn't have to stay there, once it registers the parcel, it can be moved off to a sidewalk or rental office.
| |
| | |
| ==== ''Manager handling your setup?'' ====
| |
| ----
| |
| ''Rez out all the units that are needed - or drag-copy as many as you need - '''NOW''' before the configuration process begins!
| |
| | |
| === 3) Grant debit permissions ===
| |
| ----
| |
| : ''See the '''[[Debit_Permissions | debit permissions]]''' page to details of what these are and why they should be granted.''
| |
| | |
| : <span style="color:#F00;">''NOTE: If you are re-rezzing a copy of a unit you've already granted permissions for, you won't see another debit perms popup. This is normal. ''</span>
| |
| | |
| === 4) Recognize rented state changes? ===
| |
| ----
| |
| : ''Follow the instructions on the '''[[CasperLet/Customisation#Showing_Rental_State_Changes_Automatically | CasperLet customisation page]]''' to make sure they STILL change once you're done with configuration. If you make changes without following these instructions, rental units will not change between rented and available states. ''
| |
| | |
| === 5) Go to CasperLet website and log in ===
| |
| ----
| |
| : ''Click one of your rental units, select "config" from the popup menu, use that link to go to the website, and log in.''
| |
| | |
| === 6) Set your different individual settings ===
| |
| ----
| |
| : ''For '''each''' unit you want different from your base defaults, you will need to:
| |
| ::# Click that specific unit
| |
| ::# Select "config" from the popup menu
| |
| ::# Arrive at the individual unit's configuration page
| |
| ::# Make your changes
| |
| ::# Remember to click "save" for each option with a "save" button
| |
| ::# Remember to click "save" at the bottom when done
| |
| | |
| | |
| = '''<span style="color:#00528c">Notecard Delivery</span>''' =
| |
| Only you - the system owner - can edit and replace the notecards. Managers are not able to do this.
| |
| | |
| Managers may select different notecards from the supply that is '''already''' in the DropBox.
| |
| | |
| You are free to name your notecards whatever you like - "information" is used here to refer to the notecard sent to prospective tenants, and "rented" to refer to the notecard that gets sent to the tenant after they rent the unit.
| |
| | |
| === Selecting Notecards ===
| |
| ----
| |
| :# Place your "information" and "rented" notecards in your DropBox.
| |
| :# Log in to the CasperLet website
| |
| :# If you have '''one''' notecard for '''all''' rentals, then select the notecard via the bulk '''[https://let.casperdns.com/units.php Units page.]'''
| |
| :# If you have multiple notecards for different rentals, one may be set on the bulk '''[https://let.casperdns.com/units.php Units page]''', but the rest will have to be set via the individual unit configuration pages.
| |
| | |
| === Selecting Landmarks ===
| |
| ----
| |
| :# Place your landmark(s) in the Dropbox
| |
| :# Log in to the CasperLet website
| |
| :# If you have '''one''' landmark to use with '''all''' of your rentals (such as a rental HQ area), then select that landmark via the bulk '''[https://let.casperdns.com/units.php Units page.]'''
| |
| :# If you have multiple landmarks for different rentals (for example, if you have one landmark per rental), they will need to be set via the individual unit configuration pages.
| |
| | |
| For more information about DropBoxes, and why they need to '''stay''' rezzed out, see the '''[[CasperVend_2/DropBoxes | DropBoxes page]].
| |
| | |
| '''Remember:''' Scripted objects in general will not function if you do not rez them under the proper land group. DropBoxes are no exception.
| |
| | |
| (If you have both CasperVend and CasperLet, it '''is''' normal to see '''all''' of your notecards, from both CasperVend and CasperLet, in the notecard selector box, regardless of whether the DropBox originally came from a CasperVend or CasperLet pack.)
| |
| | |
| | |
| = '''<span style="color:#00528c">Prim Counting</span>''' =
| |
| For information on when and how to use the prim counter, and about scripted prim autoreturn, see the '''[[CasperLet/Prim_Counter | Prim Counter]]''' page.
| |
| | |
| Scanning Rental Units
| |
| (( --> webscan page ))
| |
| Payments
| |
| -- Transaction Logs
| |
| -- Proxy Payments
| |
| -- Cannot Restrict By Avatar/Group
| |
| -- Will Accept Payments Even When Set "Won't Renew"
| |
| Rental Management (( new page? ))
| |
| -- Quickly Finding Tenants
| |
| -- Seeing Rentals-Per-Region
| |
| -- Auto-Evict Note
| |
| -- Rental Rates Note
| |
| -- Floating Text On or Off
| |
| -- Adding a manager
| |
| -- Rent Paid, But Not Updated
| |
| -- Rent Paid, But Some/All Money Refunded/Never Arrived
| |
| -- See Time Remaining?
| |
| -- Viewing Rental Logs
| |
| -- Via Inworld Interaction
| |
| -- Via Website Only
| |
| -- Sales, discounts, etc.
| |
| -- Profit sharing
| |
| -- Known Limitations
| |
| Rental Office Setup
| |
| (( --> Rental office page ))
| |
| Group Bots For Invites & Ejects
| |
| (( --> Bot Setup page ))
| |
| Tenant Management (( new page? ))
| |
| -- Maximum Tenants
| |
| -- Transferring / Copying configuration
| |
| -- Swapping Renters
| |
| -- Physically moving units
| |
| -- Why You Shouldn't Re-Rezz A Unit
| |
| -- Customer Wants Higher Prim/Impact Limit
| |
| -- Locking Rental Units
| |
| -- By Individual Units
| |
| -- By Bulk Options
| |
| -- Reserving Rental Units
| |
| -- Cancelling a reservation
| |
| -- Group Restrictions Workaround
| |
| Notification Messages to Tenants
| |
| -- Notifications via SmartBots
| |
| -- Who gets reminders?
| |
| -- Reminders sent before the tenancy ends
| |
| -- Reminders sent after the tenancy has ended
| |
| -- Why aren't notifications received?
| |
| -- Testing notifications
| |
| Mapper / Map Table
| |
| Touch/Popup Menu Options
| |
| Hippo Migration Toolkit
| |
| (( --> Hippo toolkit ))
| |
| Script Components
| |
| -- Door & Sign Samples
| |
| -- Changing Sign Texture
| |
| -- CasperLet API
| |
| FAQ / Troubleshooting
| |
