|
|
| (7 intermediate revisions by the same user not shown) |
| Line 1: |
Line 1: |
| {|align=right
| | === Adding ThoysBot to CasperLet === |
| |__TOC__
| |
| |}
| |
| [[File:German_flag.gif]] [[GroupBots/DE | Schaue hier in Deutsch!]]
| |
| | |
| = '''<span style="color:#00528c">What will bots do?</span>''' = | |
| A properly set up bot is capable of handling both invites and ejects for groups - either on rentals (for CasperLet) or product purchase (for CasperVend; both inworld and Marketplace) and if you choose to use a "personal bot" from SmartBots, the bot is also capable of handling bot-based delivery, ideal for products that are no-copy. (Inventory drops from scripted gadgets simply vanish, never to be seen again, if accidentally declined. If an item is sent from an avatar, it at least goes to the trashcan first when it's accidentally declined.)
| |
| | |
| === Terminology ===
| |
| ---- | | ---- |
| : '''Bot:''' A unattended avatar account, used for automatic programmed activities or responses
| | {| class="wikitable" |
| : '''Hosted Service:''' You pay a third party to host the bot for you. Generally, you pay every week, and they are responsible for making sure everything is running. | | |- |
| : '''Self-Hosted:''' You need to host the bot yourself, on your own computer. If you don't keep a computer on 24/7 already, then self-hosting is probably not for you. | | ! style="white-space: nowrap; background: #33CCFF; border: 2px solid #383838;" | Steps to perform |
| | | ! style="white-space: nowrap; background: #33CCFF; border: 2px solid #383838;" | Reference Image |
| = '''<span style="color:#00528c">Sit, Rover, Sit!</span>''' =
| | |- |
| To get your bot to sit on an object (pose stand, chair, etc.) follow the instructions on the '''[http://www.smartbots2life.com/docs/Sit_Second_Life_bot_on_selected_object SmartBots site]'''. These instructions are originally set up for SmartBots, but '''might''' work for other bots or metabolt as well.
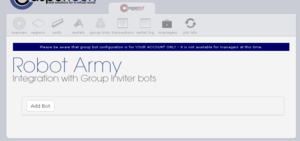
| | | valign="top" | Log in to CasperLet, go to the '''[https://let.casperdns.com/groups.php Group Bots]''' page and click the '''"Add New"''' button. <br /><br />(If you already have existing bots set up, you will see a list of bots under the "Add New" button - if you wish to edit an existing bot configuration, click the "Edit" button next to the name of the bot you want to edit instead.) |
| | | | [[File:Robot Army 2016 - 01.png|300px|thumb|left|Click for larger image]] |
| You will need the UUID of the object you want your bot to sit on. In Firestorm, you will see the object's UUID if you right-click then select "Edit". If you're using any other viewer, you can simply copy this script into a script file in your object, and once the script saves, it will tell you the UUID of the object in local chat (just open up your chat buffer and look for yellow text):
| | |- |
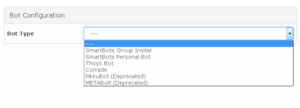
| | | | valign="top" | Use the pulldown to select your bot type. |
| default{
| | | [[File:RobotArmy-BotChoices.png|300px|thumb|left|Click for larger image]] |
| state_entry(){
| | |- |
| llOwnerSay("This object's UUID is: " + (string)llGetKey());
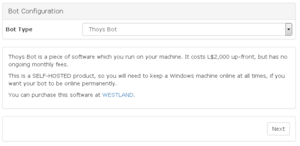
| | | valign="top" |You will be presented with information about:<ol><li> The bot type you've chosen </li> <li>Where to purchase the bot in question (in case you don't have it already).</li></ol> |
| }
| | These screen assumes your choice is ThoysBot. |
| }
| | | [[File:RobotArmy-Thoys.png|300px|thumb|left|Thoys bot info]] |
| | | |- |
| If you re-rez your object, it will get a '''new''' UUID, so you will need to use this script again to make sure your bot is up to date.
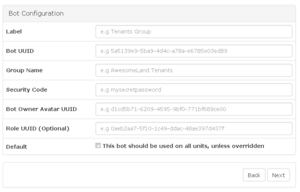
| | | valign="top" | If you have selected '''Thoys bot''' you'll see this screen. Remember that: <br /><ol><li>'''Label''' = Display name of that bot as you want it to appear in your bots list.</li></ol><br />Once you are done entering in setup information, click the "Next" button. If you've missed information that is required, there will be a popup screen to tell you what you're missing when you click "Next". |
| | | | [[File:RobotArmy-ThoysSetup.png|300px|thumb|left|Click for larger image]] |
| = '''<span style="color:#00528c">Hosted Service</span>''' = | | |- |
| == '''<span style="color:#00528c">SmartBots</span>''' ==
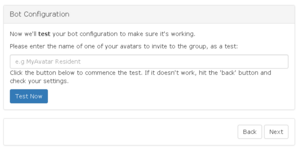
| | | valign="top" | Now you will arrive at the test screen. Click the blue '''"Test Now"''' button to begin testing the configuration. |
| SmartBots is a third party bot hosting service that also allows you the option to have your own bot account hosted by them (so you don't have to run your computer 24/7 for your bot).
| | | [[File:Robot Army 2016 - 05.png|300px|thumb|left|Click for larger image]] |
| | | |- |
| === SmartBots Info & Instructions ===
| | | valign="top" | You will get a "Please Wait" window while the test is in progress, as shown here. |
| ----
| | | [[File:Robot Army 2016 - 06.png|300px|thumb|left|Click for larger image]] |
| :* For information on pricing, see the '''[http://www.mysmartbots.com/docs/Prices SmartBots price list]'''.
| | |- |
| :* The two types of SmartBot bots used with CasperTech are the '''group inviter''' bot and the '''personal bot'''.
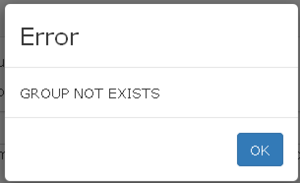
| | | valign="top" | If you have an error in your bot configuration, you'll get an additonal popup with the error message. <br /> <br />This is a '''sample''' of what the error message popup will say - there will be different errors depending on the configuration issue, and the selected bot. |
| :* For details on setting up your SmartBots bot, see the '''[[SmartBots | SmartBots]]''' page. | | | [[File:RobotArmy2016 - ErrorSample.png|300px|thumb|left|Click for larger image]] |
| | | |- |
| = '''<span style="color:#00528c">Self-Hosted</span>''' =
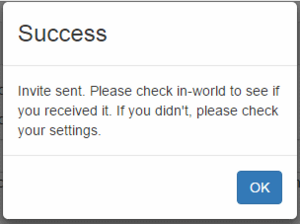
| | | valign="top" | If the test of your configuration was a success, you will see this message. |
| In order for self-hosted bots to be used, they must be running 24/7 on a machine that YOU control.
| | | [[File:RobotArmy2016 - Success.png|300px|thumb|left|Click for larger image]] |
| | | |- |
| == '''<span style="color:#00528c">Corrade Bot - Advanced Users Only</span>''' ==
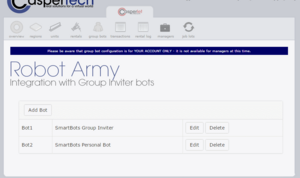
| | | valign="top" | Clicking '''"OK"''' on the Success screen will automatically take you back to the main bots page, with your newly configured bot appearing in the list. <br /><br /> An '''example''' of a list of bots may be seen in this image. |
| {{Warning|June 2016: You need the latest "Progressive" version 9.9.1 '''or later''' to work with CasperTech products. The "conservative" version does not have the functions for CasperTech at this time.}}
| | | [[File:RobotArmy2016 - BotList.png|300px|thumb|left|Click for larger image]] |
| :* Corrade is for '''advanced''' users - the setup will be confusing for inexperienced operators.
| | |} |
| :* Corrade is free to '''[http://grimore.org/secondlife/scripted_agents/corrade#download_binaries download]''' and use
| |
| :* Full documentation is '''[http://grimore.org/secondlife/scripted_agents/corrade at Grimoire.org]'''
| |
| | |
| === Minimum System Requirements ===
| |
| ----
| |
| :* Unix: Linux or BSD + Mono 3.2.8
| |
| :* Windows: .NET framework 4.5
| |
| :* x86 or ARM dual-core CPU
| |
| :* 250MB RAM
| |
| :* Always-on internet connection
| |
| :* An editor that loads and saves files encoded in UTF8
| |
| | |
| == '''<span style="color:#00528c">Thoys Bot</span>''' ==
| |
| :* Thoys Bot may be purchased at the '''[http://maps.secondlife.com/secondlife/WESTLAND/107/142/22 Westland sim/region]'''
| |
| :* The cost is L$ 2,000 up front
| |
| :* There are '''no''' monthly fees.
| |
| :* Documentation may be found on '''[http://slbot.thoys.nl/?page=home the website]'''
| |
| | |
| === Minimum System Requirements ===
| |
| ----
| |
| :* Windows XP SP2, Win2000, Vista or Windows 7
| |
| :* .NET framework 3.5 or higher
| |
| :* Always-on internet connection
| |
| | |
| = '''<span style="color:#00528c">Depreciated</span>''' =
| |
| {{Critical|'''These bots are no longer developed and/or maintained. As of June 2016, they currently still work, but any existing bugs will not be fixed.'''}}
| |
| | |
| == '''<span style="color:#00528c">METAbolt</span>''' ==
| |
| METAbolt is a free text-based viewer for Second Life. METAbolt is popular for self-hosted bots because it needs minimal setup, and takes minimal system resources on the computer it is running on (so multiple instances can be running simultaneously).
| |
| | |
| === Minimum System Requirements ===
| |
| ----
| |
| :* Microsoft .Net 3.5 SP1 - '''[http://www.microsoft.com/en-us/download/details.aspx?id=22 Download]'''
| |
| :* '''Windows:''' XP/SP2, Vista, Windows Server 2003, Windows 7, Windows Server 2008
| |
| :* Always-on internet connection
| |
| | |
| === METAbolt Installation ===
| |
| ----
| |
| :* Download and install .Net if it's not already
| |
| :* Get METAbolt - '''[https://bitbucket.org/METAbolt/metabolt.bitbucket.org/overview Download]'''
| |
| :* Open the .zip file and double-click on "setup.exe"
| |
| :* Let the install complete
| |
| | |
| === METAbolt Instructions ===
| |
| ----
| |
| :* See the '''[[METAbolt]]''' page for details on setting up your bots.
| |
| | |
| | |
| == '''<span style="color:#00528c">PikkuBot</span>''' ==
| |
| | |
| PikkuBots is a bot system that allows you to download and self-host one or more bots, or they can host the bot for you. Pikku has 49 commands available for the "lite" version, and over 500 commands available for the "premium" version, whether or not you self-host or have them host a bot for you. Be aware that while PikkuBot is very powerful in features, it is potentially very complicated to get fully set up. If you get "lost" easily, consider METAbolt (if you want to self-host) or SmartBots (if you want to have someone else host the bot) instead.
| |
| | |
| === Minimum System Requirements ===
| |
| ----
| |
| :* Microsoft .Net 3.5 SP1 - '''[http://www.microsoft.com/en-us/download/details.aspx?id=22 Download]'''
| |
| :* '''Windows:''' XP 32bit / 64bit, Vista 32bit, Home Server 32bit, 2003 Server 32bit / 64bit (others may work but are NOT tested)
| |
| :* '''Apple:''' Mac OS X 10.5 or later
| |
| :* '''Linux:''' Linux with Mono-Beta
| |
| :* Always-on Internet connection, for self-hosting
| |
| | |
| === PikkuBot Installation ===
| |
| ----
| |
| :* Download and install .Net if it's not already
| |
| :* Get PikkuBot Installer - '''[http://www.pikkubot.de/dokuwiki/doku.php?id=download Download]''' | |
| :* Double-click on the installer.exe
| |
| :* Let the install complete
| |
| | |
| === PikkuBot Info & Instructions ===
| |
| ----
| |
| :* See how to '''[http://www.pikkubot.de/dokuwiki/doku.php?id=howtos:how_do_you_prepare_a_bot_account_-_sl_account_settings prepare a bot account for PikkuBots]'''
| |
| :* For information on PikkuBot hosting rates, see the '''[http://www.pikkubot.de/dokuwiki/doku.php?id=registration PikkuBot price list]''' page.
| |
| :* View the '''[http://www.pikkubot.de/dokuwiki/doku.php?id=faq FAQ about PikkuBots]'''
| |
| :* View the '''[http://www.pikkubot.de/dokuwiki/doku.php?id=wiki PikkuBot documentation hub]'''
| |
| :* See the PikkuBot '''[http://www.pikkubot.de/dokuwiki/doku.php?id=installation:hint_regarding_vista warning with Windows Vista]'''
| |
| :* Troubleshoot '''[http://www.pikkubot.de/dokuwiki/doku.php?id=installation:error_messages_at_start error messages]'''
| |
| | |
| === PikkuBot bug === | |
| ----
| |
| :* Your PikkuBot can '''NOT''' be on the same sim as '''ANY''' of your vendors, OR any neighbouring regions right next door to a region with your vendors, or group invites will not work. If you move your bot to another region, you may need to wait up to 2 minutes before invites will start working.
| |
| | |
| This is due to Pikkubot not understanding messages delivered with llRegionSayTo.
| |
