WebKiosk/Rental Kiosks
What Are Rental Kiosks?
The rental kiosk allows your potential tenants to browse your available Casperlet rentals. (By default, locked and reserved rentals will not show on the available lists.) You can use the default of "show all", or you can create groups of rentals and assign one group to one kiosk. You also have the option to display your available rentals by using each kiosk's available embed code on your own website.
Each site link that is generated by clicking the kiosk is a one-time link: Regardless of success or failure on the part of the web browser, it expires upon use and the user will need to click the kiosk for a fresh link.
Is There A Demo?
Yes! Go to the CasperTech store, go through the doorway, and down the right-hand set of stairs to the lower level with the redelivery terminal. You'll see the demo kiosk on the same wall with the vendors for CasperLet and the Web Kiosk pack.
Rental Kiosk Owner Menu
- Rez the Rental Kiosk
- Grant Debit Perms - the kiosk will not function without them.
- If you are re-rezzing a kiosk you already granted debit permissions to, it will not ask you again. This is normal.
- Click the kiosk to get the popup menu
 |
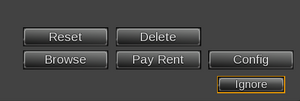
- RESET - Resets the kiosk. Soft reset, will not ask you for debit perms.
- DELETE - Self-deletes the kiosk. No, you cannot fish it out of your trash if you did this by accident.
- BROWSE - Takes you to the list of available rentals accessible via that kiosk.
- PAY RENT - Allows customer to pay one of their rentals. Customer will be presented with a popup list and they need to select the relevant rental before they can pay the kiosk.
- CONFIG - Sends owner to the kiosk's configuration page.
Rental Kiosk Customer Menu
 |
- BROWSE - Takes customer to the list of available rentals accessible via that kiosk.
- PAY RENT - Allows customer to pay one of their rentals. Customer will be presented with a popup list and they need to select the relevant rental before they can pay the kiosk.
Basic Kiosk Setup
- Rez the shipping crate and click to unpack
- From your inventory, rez the Rental Kiosk
- Grant debit permissions - the unit will NOT function without them.
- Rename the rental kiosk, if desired
At this point, your rental kiosk will be using the default behavior, which gives customers who click the "browse" option a complete list of your available rentals on all sims/regions that you have properties on.
You are now all set for basic operations.
Configuration Page Options
Here you may:
- Set up or apply a custom rental profile - see the Rental Profiles page for more information.
- Grab the embed code for your domain's website.
- Allow (or disallow) payments via the kiosk.
- Set the kiosk to show (or not show) rentals that are in use.
- Set a custom URL to point customers to your embedded listings on your domain.
Setting Custom Kiosk URL
Once you have set up your rental profile on a kiosk, simply:
- Highlight the URL from the address bar on the finished rental profile page
- Copy that URL
- Choose your kiosk object of choice
- Paste into a basic llLoadURL script into your kiosk object, and save
NOTE: The llLoadURL script should be the ONLY script used for a custom kiosk URL inworld. The CasperLet default kiosk script is NOT used in this case.
llLoadURL script
    default
   {
       touch_start(integer total_number)
       {
        llLoadURL(llDetectedKey(0), "text goes here", "Paste your URL here");
       }
    }
Errors
llLoadURL - invalid or unsupported scheme.
- You must include the "http://" or "https://" portion of the URL.
Customising the Kiosk
- Rez an official rental kiosk
- Right-click > open > copy to inventory
- Select and rez your preferred kiosk object
- Right-click > edit > contents tab on the new kiosk object
- Drag the script from your inventory into the new kiosk object
That's it, it's ready to set up and use!
Customising Your Domain With Rental Listings
Requirements
You must:
- Already have your own domain, hosting, and website for your rental company
- Know how to properly edit web pages
- Know how to get page changes on to the web server
Embedding listings requires you to already have this knowledge.
CasperTech will not provide technical support for webpage editing or problems with your web host (though we can help narrow down whether it is a webhost issue or something on our side).
Embedding Process
- Click the kiosk and choose "Config"
- You will arrive at the Kiosk's configuration page
- Grab the embed code and insert it into your site's rental listing web page
- Be sure to send your changed pages to your webhost
JSON API for developers / advanced customisation
You can retrieve the JSON output directly from our servers if you wish to customise the output, from this URL:
https://www.casperpanel.com/api/rentals.php?accessKey={YOUR_ACCESS_KEY}
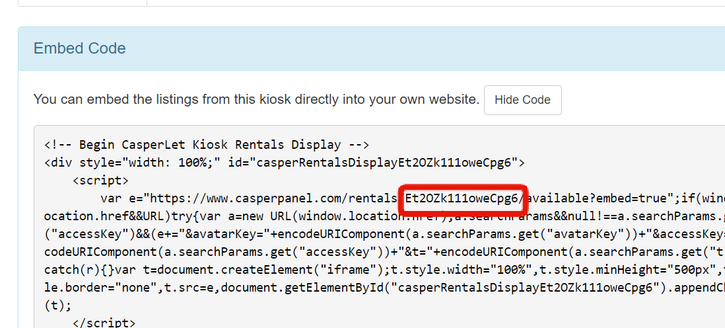
Replace {YOUR_ACCESS_KEY} with the access key of your rental profile, which you can see in the embed code:
In this example, my access key is Et2OZk111oweCpg6, so my final URL for JSON will be:
https://www.casperpanel.com/api/rentals.php?accessKey=Et2OZk111oweCpg6
Renaming Online Rental Listings
The list on the web picks up the names from the rental units inworld. See the rental customisation page for details on how to change the name on inworld units.
