CasperSafe Security Orb
Features
- Self-contained configuration - no notecards
- Fewer scripts than competing products - 4 instead of 11-13 scripts
- CasperLet Support
- Visitor Tracking option
- Region-wide operation
- Capable of monitoring many parcels at once
| Depending on your viewer configuration (fonts, UI size, etc.) the length of the option names may not be identical to what's shown here. Popup menus shown here are from Viewer 3. |
What's in the Box?
The following named items are in the shipping crate:
- CasperSafe Enforcer
- CasperSafe Parcel Link Tool
- CasperSafe Psychic Link Script (Read the instructions!)
- CasperSafe Security Orb
Along with a landmark to the CasperTech store.
What's with the 'war is peace' stuff?
The orb has been themed in several ways with tongue-in-cheek references to George Orwell's 1984, a novel about totalitarian control, monitoring and mind control. It's not a political statement, just a cultural reference.
Quick Setup Steps
- Rez the shipping crate and unpack
- Rez out the CasperSafe Security Orb
- Add areas and/or link to rental unit
- Rez (and deed if necessary) the Enforcer unit
- Add people to appropriate access lists
- Arm the orb
See the sections below for explanations of all the options.
Configuration Tips
CasperSafe will save its configuration on the server. Like CasperLet and SimpleSit, this is saves the information against the UUID of the device, barring a complete script reset (which makes it forget everything) or shift-drag-copy (the copy that is left behind has both reset the script AND has a new UUID and thus no old configuration.)
- Takes about 20-30 seconds to save configuration changes.
- Configuration is kept when you "Take a copy" then Rez the copy
- Configuration is NOT kept when you shift > drag > copy (this resets the script)
- Like CasperLet, the script tracks the UUID of the device. New device = new UUID, thus shift > drag > copy = New device and new UUID.
- Information will NOT transfer between two unrelated or different version orbs. (This would be a hassle for landlords, where different orbs are expected to have different individual configurations depending on the renter.)
- When used with CasperLet, the owner and any CasperLet managers are automatically admins
- When used with CasperLet, the primary tenant + additional subtenants on that rental are added automatically to the SUBADMIN access list.
CasperSafe is not meant to be configured via the website - while this may make it less convenient, this does ensure that it continues to function despite any website outage.
Checking Version Number
Because the UpgradeBee does NOT rename the object, if you wish to verify that your orb(s) have been updated, you will need to edit > contents tab > right-click on one of the scripts > select "Properties" > check the version number in the description field. See the versions page for current version number and changelog information.
Security Settings & Levels
Access Levels
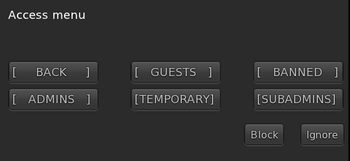
When Admins click into the access menu, they will get the following options:
 |
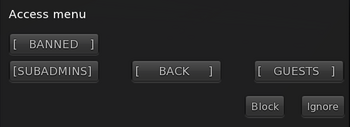
When Subadmins click into the access menu, their options will be a little different:
 |
Access Level Chart
| Main Menu Option | Guests | SubAdmins | Admins |
|---|---|---|---|
| Areas | No | No | Yes |
| Arm / Disarm | No | Yes | Yes |
| Lockdown | No | Yes | Yes |
| Link / Unlink (rental units) | No | No | Yes |
| Access Menu | No | Yes (subadmins / guests / ban list) | Yes |
| Options | No | No | Yes |
| Visitor Tracking | No | Yes, no sales | Yes, with sales |
- Admins: This is the owner, plus any additional designated avatars added to the orb's Admin list.
- SubAdmins: Usually subadmins are the tenants of a landlord. As a result, they will not have access to the options list or other higher administrative functions of the orb.
- Guest: This option allows you to add a mostly permanent "whitelist" of allowed guests. Guest level does not come with menu access to the orb.
- Temporary: Like the "Guest" level, except that people added to the temporary list are automatically removed after they leave the sim/region.
- Banned: This option allows you to add to a list of "never allowed" avatars. Anyone on the ban list will automatically be ejected/teleported him upon arrival, if ejection is on and an enforcer is out (and properly deeded if necessary.)
Security Notes
Each CasperSafe can only hold one set of security options.
If you need to have different security settings for different areas, then you'll need one orb per set of security settings.
Yes, you can rez multiple orbs on the same sim/region.
- When used with CasperLet, the owner and any CasperLet managers are automatically admins
- When used with CasperLet, the primary tenant + additional subtenants on that rental are added automatically to the SUBADMIN access list.
- Two CasperTech support avatars are added to the whitelist to make it easier to provide any needed support: Casper Warden and CasperHelp Resident.
- Lockdown mode automatically ends when the protected area is empty of all allowed avatars.
Warning Times
Minimum warning time of 20 seconds (default setting of 30 seconds).
Lockdown mode warning time of explicitly 10 seconds, regardless of normal warning time setting. Lockdown mode ends automatically when all allowed avatars leave the protected area.
There is no "instant eject" unless the avatar is explicitly on the orb's ban list.
CasperSafe Enforcer
This is the widget that actually does the ejecting / teleport home functions. Thus it is required if you actually want to be able to boot avatars out of the protected area - Otherwise CasperSafe operates in "Warning Mode" which basically nags the avatars instead.
Like the CasperLet Prim Counter, in order to function properly, the Enforcer widget must be owned by the LAND OWNER. If the land is owned by an individual, that individual must REZ the Enforcer widget. If the land is owned by a group, the Enforcer must be REZZED by an individual with the same group tag as the parcel, and they must then DEED the Enforcer to the group. If there are multiple land owners, then you will need one Enforcer per land owner.
The permissions of the Enforcer widget are copy & transfer so that it can be deeded to the appropriate land owners.
UPDATES: The enforcer only needs to be replaced when a new enforcer version goes out.
Enforcer, Group Detection, Autreturn and You
If you are using group detection, it is highly recommended that you do NOT use the object return feature, because people will always forget their group tag, and having object return on may result in an individual having their objects returned.
Monitoring Areas
Custom Areas
Custom Areas: Limited only by available memory
- Click for menu
- Select "Areas"
- Select "Add"
- Select "Custom"
- Corner markers will appear
- Drag the lower marker to the lowest corner of the area you want to monitor
- Drag the upper marker to the uppermost corner of the area you want to monitor
- Click one of the markers
- Select Save
- Name the area
- Done!
If you accidentally manually delete one marker, the corresponding one will self-delete as well.
Custom Ranges
Custom Ranges: Limited only by amount of available memory in the orb.
To set a custom area:
- Click the orb
- Select "Areas"
- Select "Add"
- Select "Range"
- Enter in the detection range, in meters, and click "Send"
- Enter name of the area, and click "Send"
- Done!
Parcel Link
Number of Parcels: Limited only by amount of available memory in the orb.
The Parcel Link Tool allows CasperSafe to be paired with one or more parcels. The Parcel Link Tool must be used on the parcel that will be linked to the CasperSafe orb, and ONLY by the owner of the orb. (Admins and subadmins cannot add a parcel using the Parcel Link Tool because the Tool is no-transfer.) This may be rezzed on any parcel and moved over, just be sure to allow a minute or two for it to pick up the change in parcels.
- 1) Rez the CasperSafe Security Orb on the land you want it to monitor
- 2) Rez the "Parcel Link Tool" - You will get these messages in local chat:
  Touch me to pair this parcel with your CasperSafe orb.
  Make sure you have started pairing on the orb by choosing AREA -> ADD -> PARCEL, first.
  I'm now over parcel ((parcel name as seen in "about land" floater)). Touch to register with a CasperSafe Orb.
- 3) On the CasperSafe orb, click for the popup menu
- 4) Select "Areas"
- 5) Select "Add"
- 5) Select "Parcel"
- 6) Then click the Parcel Link Tool. You'll see the following messages in local chat:
  OK. Trying to find a CasperSafe orb, please stand by.
  Alright, all done!
  Pairing process ended.
- 7) The Parcel Link Tool will self-delete when the parcel pairing process is completed.
Pairing process usually takes 1-2 minutes, but may be longer if the region is heavily lagged.
Rental Unit Pairing
Pairing limit: 1 rental unit per orb
NOTE: CasperSafe may be paired with only ONE rental unit. If you have multiple rental units out, AND you want to pair CasperSafe to the units, you'll need one CasperSafe per unit.
- 1) Rez CasperSafe Security Orb near the rental unit
- 2) Drop the "Psychic Link Script" into the corresponding rental unit
- 3) Watch messages in local chat. If all goes well, you should see:
  Okay, let's have a look here..
  Ooh, CasperLet! Good choice! Searching for the orb..
  Cool! I'm paired with ((name of rental unit)) (Key: ((uuid string)) )
  Pairing process ended.
- 4) The orb will also add the CasperSafe system owner as an ADMIN automatically.
Pairing process usually takes 1-2 minutes, but may be longer if the region is heavily lagged.
Link to Rental Unit
Clicking LINK on the main menu:
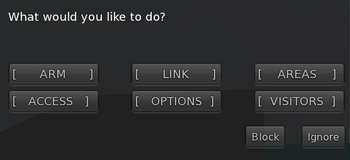 |
Will get you to the LINK instructions. This option will link one copy of CasperSafe to ONE rental unit:
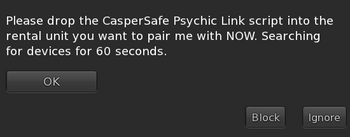 |
This starts the pairing process between CasperSafe and a single rental unit.
Once you've clicked the LINK option, simply drop the "CasperSafe Psychic Link" script into the corresponding rental unit and it will do the rest by itself.
If you clicked into this option this by mistake, simply wait a minute or two for the process to time out. When you see the "Paring ended" message, you can go back to doing what you were trying to do.
Remember that you cannot pair CasperSafe to multiple rental units - but you can manage multiple parcels. If you expect to use CasperSafe with multiple rental units, you will need one (1) CasperSafe per rental unit that will have security.
About the Base Menus
By default, when you first rez out CasperSafe, the orb is in the "unarmed" state. When unarmed, the orb automatically runs in "discreet mode" in order to be kinder to region resources.
 |
When you choose to arm the orb, you will also have an extra "lockdown" option, as shown here:
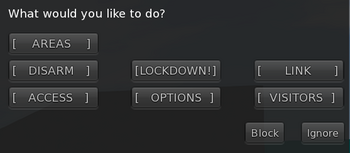 |
When CasperSafe is armed, the base menu will also show the option "Lockdown" - this changes the warning time to 10 seconds (reduced from the normal minimum of 20 seconds), and increases the scan frequency in order to detect possible threats more quickly.
Also, when someone arrives who is not on any of the access lists, admins will get a popup asking them if they want to add the new arrival on a temporary or guest basis, or whether to ban.
Subadmin Main Menu
Subadmins will typically be tenants of a landlord, and will not have administrator access to the higher functions of the security orb; their main menu options will look like this:
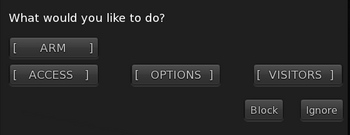 |
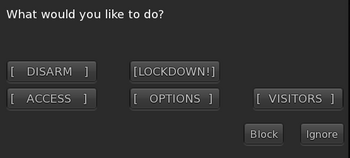 |
About Lockdown mode
If the orb is currently in "lockdown" mode, the lockdown option will change to "stand down" as shown here:
 |
This automatically disables itself when everyone ON the access list has left the region - there is no time limit beyond waiting for every allowed person to leave the protected area.
Note that Lockdown mode uses slightly more script time than normal operation (see Script Times for details).
Security Menus
Options - Defaults
These are the default settings for the options menu, as it ships from CasperTech:
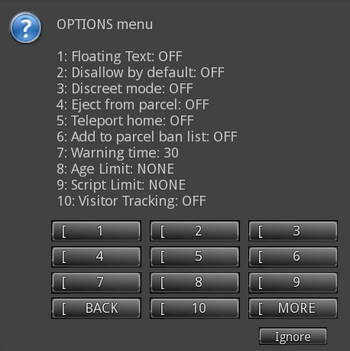 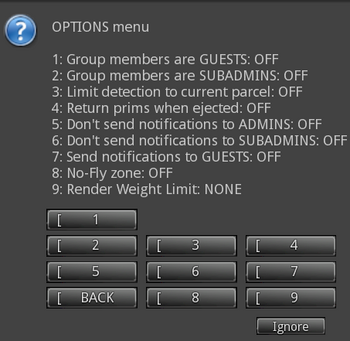 |
Configuration Options
| Options Items | What it does |
|---|---|
| Floating Text | This turns the radar on and off. Having the radar on will use more script time and processing. |
| Disallow by default | When on, this will eject anyone who's not on the access list. |
| Discreet mode | When on, this slows down the timers to reduce lag. It won't be as responsive, but it will be kinder to region resources. |
| Eject from parcel | When on, this will eject unwanted visitors after the warning period has ended. |
| Teleport Home | When on, this will teleport unwanted visitors to their home point. |
| Add to parcel ban list | When on, this will add ejected avatars to the parcel's land ban list (not the ban list in the orb). |
| Warning Time | This controls how long the avatar can stay before being ejected, if eject mode is on. In "Warning mode" (which is the default, if there is no Enforcer present and/or properly deeded) this is how long before CasperSafe sends another warning to the intruding avatar. The shipped default is 30 seconds, and may be reduced to 20 seconds for normal operation. When in lockdown mode, the warning time is hard-set at 10 seconds. |
| Age Limit | When on, you configure the minimum number of days of account age before avatars are allowed in to the protected area. |
| Script Limit | When on, you configure the maximum amount of scripts an avatar may be wearing/using before they are allowed in to the protected area. |
| Visitor Tracking | When on, this tracks visitors and sends visitor data to the CasperTech website. Visitors cannot (currently) be filtered by admin/subadmin/guest levels; access list data is not sent to the website. |
| Group members are guests | When on, allows members of the group the orb is rezzed under into the protected area. "Guest" access does not include any part of orb menus. |
| Group members are subadmins | When on, allows members of the group the orb is rezzed under both into the protected area and gives them subadmin access to the orb itself. |
| Limit detection to current parcel | When on, this limits detection ranges to within the borders of the parcel the orb is rezzed on. This prevents things like the orb's ejecting/banning from affecting users on other (unrelated) parcels. |
| Return prims when ejected | When on, uses the scripted prim autoreturn feature. This is not recommended in combination with group detection, because people often forget their group tag when they try to rez objects. |
| Don't send notifications to admins | When on, this prevents the orb from sending notifications to users on the "Admin" access level. By default, all messages are delivered via llRegionSay to prevent IM's from capping while you are offline. (If IM notifications are prefered, there is an optional script in the orb's shipping crate that will do this.) |
| Don't send notifications to subadmins | When on, this prevents the orb from sending notifications to users on the "SubAdmin" access level. By default, all messages are delivered via llRegionSay to prevent IM's from capping while you are offline. (If IM notifications are prefered, there is an optional script in the orb's shipping crate that will do this.) |
| Send notifications to guests | When on, this will send notifications to users on the "Guest" access level. By default they don't receive notifications. |
| No-Fly Zone | When on, the flying avatar is warned. If "Eject" is on, then the user is ejected from the area. If "Teleport Home" is on, then the user is teleported home. |
| Render Weight Limit | When on, you set the maximum avatar complexity that individual avatars should be at. Users above that point will be warned. If "Eject" is on, then the user is ejected from the area. If "Teleport Home" is on, then the user is teleported home. |
Automatic Settings
- * When used with CasperLet, the owner and any CasperLet managers are automatically admins
- * When used with CasperLet, the primary tenant + additional subtenants on that rental are added automatically to the SUBADMIN access list.
- * Lockdown mode automatically ends when the sim/region is empty of all allowed avatars.
Memory Limits
Data about names for Admin/Subadmin/Guest lists are stored IN the device. Consequently every name that's added will cause the available memory to decrease, and it will give you a local chat message indicating how much memory is left. Once the available memory gets below a certain point (somewhere around 300 names), the orb will crash - so it's up to you to keep an eye on how much memory is being used.
You CAN rez multiple orbs if you are getting low in memory on the first one.
Visitor Tracking Menus
- Visitor tracking turns ON or OFF with options menu
- Visitor data WILL be sent to CasperTech servers when turned on
Add Areas
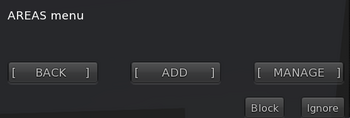 |
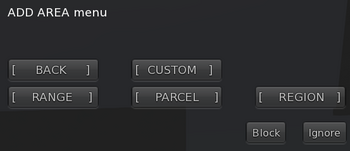 |
About Pairing
CasperSafe may be linked/paired to a single rental unit, and/or multiple parcels. You cannot link/pair a single CasperSafe to multiple rental units, but you CAN link/pair to a single rental unit AND multiple whole parcels.
You cannot cover multiple regions with a single CasperSafe device - the LSL commands used can only be issued from within the sim that the device is currently rezzed on. You will need one (1) CasperSafe device per region you want monitored.
Pairing CasperSafe to One or More Parcels
The Parcel Link Tool allows CasperSafe to be paired with one or more parcels. The Parcel Link Tool must be used on the parcel that will be linked to the CasperSafe orb, and ONLY by the owner of the orb. (Admins and subadmins cannot add a parcel using the Parcel Link Tool.) This may be rezzed on any parcel and moved over, just be sure to allow a minute or two for it to pick up the change in parcels.
Custom
Choosing custom will rez out a red and blue pair of arrows, which are used to define the diagonally opposite corners of a square or rectangular space. If the parcel you are trying to protect is irregular - non-square and non-rectangular - such as many mainland parcels, it might be more effective to use the "parcel" setting instead of "custom".
Range
Range allows you to define a circular radius of protection. The number you input may be any number (you are NOT limited to 96m!), up to the size of the sim/region.
Parcel
Allows you to protect a specific parcel on a region. You will need the Parcel Link Tool from the shipping crate to add a specific parcel to the orb.
Region
Allows you to protect the entire region.
Not Supported
No height restrictions
CasperSafe does not support any sort of avatar height restriction. Since the introduction of mesh avatars, you can no longer depend on avatar height as being a psuedo-reliable indicator of the avatar's "age". There are many non-child avatars that are also short, and non-human avatars can come in many sizes as well. Height restrictions are therefore irrelevant today, and would eliminate too many legitimate avatars.
No Instant Eject Mode
Ever been randomly teleported home by an over-zealous security system without any knowledge that it was even there? Yes, us too. It really sucks, and it makes it impossible to provide in-person support for your products.
That's why CasperSafe is designed to be fair. Security devices which are set to less than 10 seconds do not provide ample opportunity for passer-bys to vacate the area.
The default warning time is 30 seconds (reducable to 20 seconds) under normal operation. However, if you require extra privacy, you can enable "Lockdown" mode which temporarily reduces the minimum warning period to 10 seconds (until everyone in the access list has left the protected area.)
For the above reason, we don't support an "instant" eject mode. However, those who are on the "Ban" list will be ejected instantly.
Script Times
These timings were measured over a 24 hour period, on a relatively quiet full region (Izanagi). Your mileage may vary, and times may be higher on busy sims.
- UNARMED - 0.003ms
- DISCREET - 0.003ms
- ARMED - 0.004ms
- LOCKDOWN - 0.005ms
- ARMED + RADAR - 0.006ms
- LOCKDOWN + RADAR - 0.007ms
Still Need to Know....
1) How to use with other supported rental systems?
2) Visitor tracking options and menus?