CasperLet/Pay Buttons
About the Pay Buttons and Rent Costs
This page will illustrate where specific information goes in order to properly set up CasperLet payment buttons. Please read carefully, this is an area where some of the more common mistakes are made.
This page ONLY covers setting payments properly.
Units (Bulk) Page
- Log in to CasperLet
- Click the "Units" icon
You'll know you're at the right place when you see this:
If you have rental units already rezzed out, you'll see them listed individually before getting to the bulk options, like so:
To edit the individual unit, simply click the icon on the far right on the line for that unit.
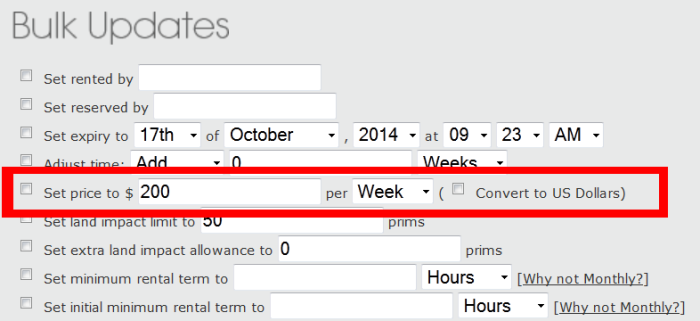
Bulk Units Page - Set Actual Rent Cost
This is where you put the actual cost to the tenant/renter, and what the timeframe is. This information is displayed to the prospective tenant when they click "info" on the rental unit inworld. Please note: If you tick/check the box for "convert to US dollars", you will get a popup warning you that this will cause the payment amounts to appear to be artificially inflated inworld!
- Tick/check the box at the beginning of the line
- Add the rental cost
- Click for the pulldown menu and select your chosen timeframe
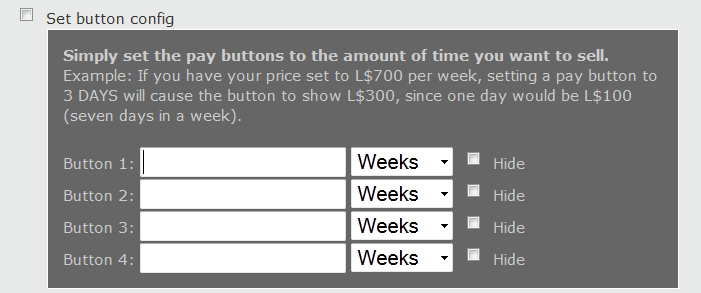
Bulk Units Page - Set Rental Timeframe Buttons
This is where the numbers go to tell the system how much time each pay button represents. DO NOT EVER put actual payment amounts here!
These are referred to as "pay buttons" because the information here lets the CasperLet system calculate what amounts should be seen on each of the four default "pay" buttons inworld.
- Enter the # of days/weeks/etc in the empty space
- Click the pulldown (where it says "weeks") and select your chosen timeframe
For example, if you are renting by the week, you put the number of weeks in the empty spaces - usually folks default to 1, 2, 3 and 4 weeks, but you can use whatever timeframe works for you - and make sure the pulldown is selecting "weeks". If you are renting by the day, simply put in the number of days in each empty space, then select "days" from the pulldown.
Individual Unit Configuration Page
You may get to the individual unit configuration in one of two ways:
- Click the unit inworld, select "config" from the popup menu, then click the link in the popup and log in to CasperLet - you'll arrive at the individual unit's configuration page.
- Go to the "units" page on the CasperLet website, and click the icon on the line for the unit you want to work with
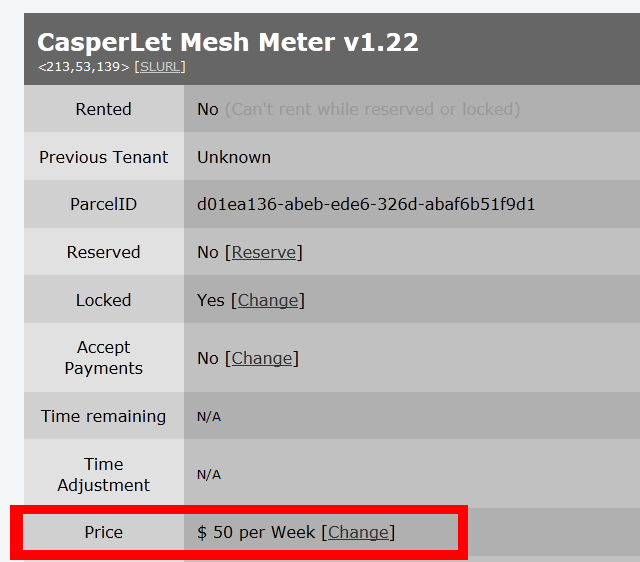
Individual Unit Page - Set Actual Rent Cost
This is where you set the actual rental cost for that particular rental unit. Remember that if you set a price here, it will override the bulk settings elsewhere on the CasperLet site for this particular unit.
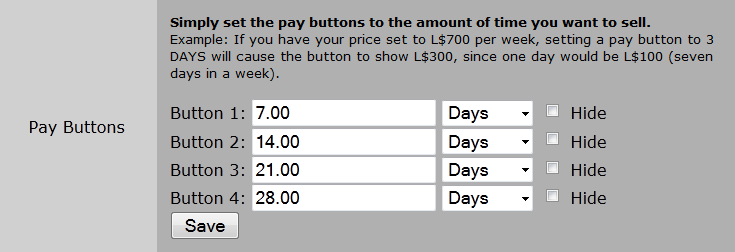
Individual Unit Page - Set Rental Timeframe Buttons
This is where the numbers go to tell the system how much time each pay button represents. DO NOT EVER put actual payment amounts here!
These are referred to as "pay buttons" because the information here lets the CasperLet system calculate what amounts should be seen on each of the four default "pay" buttons inworld. Remember that if you set options here, it will override the bulk settings elsewhere on the CasperLet site for this particular unit.


