SmartBots: Difference between revisions
Jump to navigation
Jump to search
mNo edit summary |
|||
| Line 1: | Line 1: | ||
{{Information|Get L$500 FREE wallet balance and one FREE add-on when you use coupon code 'CASPERTECH' when you register a new account with SmartBots at https://www.mysmartbots.com! (Free add-on excludes Immortal Bot Add-ons. New accounts only.}} | |||
{|align=right | {|align=right | ||
Revision as of 17:22, 3 January 2021
| Get L$500 FREE wallet balance and one FREE add-on when you use coupon code 'CASPERTECH' when you register a new account with SmartBots at https://www.mysmartbots.com! (Free add-on excludes Immortal Bot Add-ons. New accounts only. |
|
Set Up YOUR Inworld Group
- If you are running a business, you will first need a group.
- See the knowledge base article on creating a group
Create a Bot-Specific Role In Your Group
- You absolutely need to set up a bot-specific role to invite the bot to. This keeps the bot out of trouble. :)
- NEVER give the bot an owner role - you will be unable to remove the bot manually, and they will have all powers, not just the ones you want them to have.
Group Invites
CasperVend: Invites/Ejects
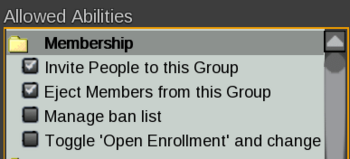
- Remember that in order to send invitations, notices or IMs, you have to provide these abilities to the bot.
- For example, a bot used JUST for invites and ejects for an inworld group requires the "Invite" and "Eject" abilities - see the image below.
CasperLet: Bot-Specific Role Abilities Needed
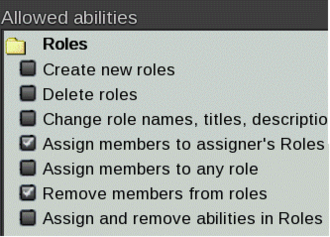
- CasperLet requires a few more abilities than just invite and eject, if you want to have a *reasonably* hassle-free rental system.
- Here images showing the bot-specific abilities that need to be in the bot's role for CasperLet:
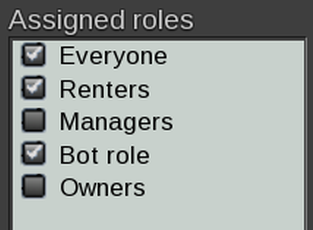
CasperLet: All Roles the Bot Should Have
- Use this image below to know what roles you should - and *shouldn't* have the bot in.
Bot Limitations
- The bot CANNOT eject someone from a role that the bot did not invite an avatar into. This is a limitation of SmartBots, not CasperTech.
- If you have manually added an avatar to an additional role, you WILL NEED TO remove them from the added roles before the bot tries to eject, OR you will need to eject the avatar manually.
Create Your SmartBots Account
- 1) Visit the SmartBots website.
- 2) Create an account
- 3) Check your email for the verify link
- 4) Click the link in email to verify the signup
Pay For Your Bot
- 1) Teleport to the SmartBots Terminal
- 2) Touch/click it, and click '"Groups..." then "Pay group..." then choose the group from the presented list.
- 3) Right-click the Terminal and choose "Pay..." (if you are not using a free week)
Missed Payments
- The services will stop immediately with a missed payment, however the bot will stay in the group for one week. (This allows for "Woopsie! Forgot yesterday, will pay today".) If there is no payment after one week, then the bot leaves the group on its own, and when/if you reactivate service you will need to choose (again) from the list of available bots at that time, or re-enable the settings for your own bot.
Payment Reminders
- SmartBots will send notifications 3-days prior to bot's expiry date as well as an e-mail. You will need to remember to pay before it expires. You may wish to use a calendar app if you're not sure you'll remember to pay it regularly.
- If you are not getting payment reminder notifications (and you know you should be), you will need to speak to SmartBots support - bot renewal notifications are a SmartBots issue, not a CasperTech one - and have them look at the problem.
- NOTE: You may need to specify "bot renewal notification" about this specific issue to the SmartBots rep, otherwise they may send you back to CasperTech, and we can't help with their system...
Add Your Group to SmartBots
To use your group with SmartBots, you have to list it in your account:
- 1) Login to your SmartBots account
- 2) Click the "Add a new group to manage..." link:
- 3) Enter your group name (we suggest copy-paste it from the viewer's group floater)
- 4) Choose whether you're using a system (group inviter) bot or the "standard" (personal) bot account
If you're using the inviter bot
- 1) Click the "system bot" link from the "add group" page
- 2) Enter your group name EXACTLY (copy/paste from inworld if you have to)
- 3) Select a bot name from the pulldown
- 4) Tick the boxes as appropriate for your group details
- 5) Click "add group"; you'll be taken to the next screen
- 6) Click Add/Remove services, and choose any/all of the following services, as needed:
- Invite to group
- Group Chat
- Group Moderate
- Group Translate
- Group Notice
- 7) Click "save"
- 8) Inworld, create a "Bot" role in the group with the necessary permissions
- 9) Invite the chosen bot into your group in the bot role
If you're using your personal / standard bot
- 1) If you don't have an extra Second Life account for your bot, create it now
- 2) Add your personal bot details to SmartBots: Log in and click "Your Personal Bots"
- 3) Click "Create New Personal Bot" on the next page
- 4) Choose your bot type - standard or model (on-site) variety
- 5) Enter the SL login name of your personal bot
- 6) Enter the SL password of your personal bot
- 7) Click "Proceed" - you'll be taken to the next screen
- 8) Click Add/Remove services, and choose any/all of the following services, as needed:
- Invite to group
- Group Chat
- Group Moderate
- Group Translate
- Group Notice
- 9) Click "save"
- 8) Inworld, create a "Bot" role in the group with the necessary permissions
- 9) Invite the chosen bot into your group in the bot role
Group Security Codes
This section assumes that:
- You have a configured and working CasperVend and/or CasperLet system.
- You have an active SmartBots account.
- Your bot is already in your group with the appropriate roles.
Getting Your Group Security Code
- 1) Visit the SmartBots website and log in
- 2) Go to your dashboard
- 3) Find the group you want to manage
- 4) Hover over the word "Members" in the box for that group - you'll see a dropdown with options
- 5) On the dropdown box, under "third party access", choose the "Group Security Code" link
- 6) Look under AdminBot Security - SmartBots gives you a security code by default.
- 7) Select/highlight the code, and then copy.
- 8) Paste into the appropriate box in the CasperLet or CasperVend setup.
Changing Group Security Code
- 1) Visit the SmartBots website and log in
- 2) Go to your dashboard
- 3) Find the group you want to manage
- 4) Hover over the word "Members" in the box for that group - you'll see a dropdown with options
- 5) On the dropdown box, under "third party access", choose the "Group Security Code" link
- 6) Under AdminBot Security, replace the code that's there with one of your choosing.
- LETTERS AND NUMBERS ONLY! DO NOT DUPLICATE ANY OTHER PASSWORDS!
- 7) Click "Save"
Standard/Personal Bot: Access Code
- 1) Log in to SmartBots
- 2) Click "Your Personal Bot"
- 3) Look for the profile picture of the bot you want to manage
- 4) Click "Manage Bot" on that profile picture
- 5) On the NEXT screen, with the outline drawing of a person, click "Bot Access Code View/Change"
If you are creating your bot access code, remember that it can only be letters and numbers - alphanumeric - you cannot use symbols. The site may or may not give you an error message, but any passcodes with symbols will just not work.
Bot Access Code is Not Group Invites
- Group invites use the "Group Security Code" detailed above
About the "Secret Key" Hash
- When you add the SmartBot secret key, the website will change the appearance of it, because it stores a hashed version. As long as the key you are entering is correct, you should be good, no matter what it looks like afterward.
Adding SmartBots to Your System(s)
- Adding SmartBots to CasperVend
- Adding SmartBots to CasperLet


