WebKiosk/Rental Kiosks: Difference between revisions
| Line 8: | Line 8: | ||
='''<span style="color:#00528c">Rental Kiosk | ='''<span style="color:#00528c">Rental Kiosk Owner Menu</span>''' = | ||
:# Rez the Rental Kiosk | :# Rez the Rental Kiosk | ||
Revision as of 00:26, 22 March 2018
| This page relates to features that are NOT ACTIVE yet. This is NOT currently applicable to your rentals. |
What Are Rental Kiosks?
The rental kiosk will allow your potential renters to browse available listings via either the default webpage list, OR via your own company's webpage via the embed code.
Each site link that is generated by clicking the kiosk is a one-time link: Regardless of success or failure on the part of the web browser, it expires upon use and the user will need to click the kiosk for a fresh link.
Rental Kiosk Owner Menu
- Rez the Rental Kiosk
- Grant Debit Perms - the kiosk will not function without them.
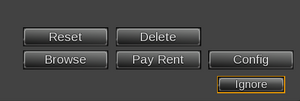
- Click the kiosk to get the popup menu
 |
- RESET - Resets the kiosk. Soft reset, will not ask you for debit perms.
- DELETE - Self-deletes the kiosk. No, you cannot fish it out of your trash if you did this by accident.
- BROWSE - Takes you to list of available rentals.
- PAY RENT - Allows customer to pay one of their rentals. Customer will be presented with a popup list and they need to select the relevant rental before they can pay the kiosk.
- CONFIG - Sends owner to the kiosk's configuration page
Configuration Page
You may configure a specific rental profile (if desired) to show via THAT kiosk. See Rental Profiles for more information.
You may also grab the embed code to put your rental listings directly onto YOUR custom website. This embed code links to the KIOSK, rather than the rental profile - you won't see a change in the embed code when you select different profiles over time - but the currently-selected profile WILL be reflected to the customer from using the kiosk inworld.