CasperLet Web Kiosk Expansion: Difference between revisions
Jump to navigation
Jump to search
| Line 37: | Line 37: | ||
|} | |} | ||
= '''<span style="color:#00528c">What Do I Do With The Kiosk?</span>''' = | = '''<span style="color:#00528c">What Do I Need To Do With The Kiosk?</span>''' = | ||
:# Rez the shipping crate and click to unpack | :# Rez the shipping crate and click to unpack | ||
:# From your inventory, rez the Rental Kiosk | :# From your inventory, rez the Rental Kiosk | ||
| Line 44: | Line 44: | ||
At this point, your rental kiosk will be using the default behavior, and give customers who click "browse" a complete list of your available rentals. | At this point, your rental kiosk will be using the default behavior, and give customers who click "browse" a complete list of your available rentals. | ||
You are now all set, unless you want to set up some of the custom features. | |||
== <span style="color:#00528c">Setting a Rental Profile</span> == | |||
If you wish to limit the properties that show on THAT particular kiosk, you will need to set up a profile with rule filters. See the '''[[Rental_Profiles | rental profiles]]''' page for details. | If you wish to limit the properties that show on THAT particular kiosk, you will need to set up a profile with rule filters. See the '''[[Rental_Profiles | rental profiles]]''' page for details. | ||
== <span style="color:#00528c">[Advanced] Embedding Listings Into Your Site</span> == | |||
:# Click the kiosk and choose "Config" | |||
:# You will arrive at the Kiosk's configuration page | |||
:# Grab the embed code and insert it into your site's listing web page. | |||
Revision as of 00:32, 22 March 2018
| All configuration of items within THIS expansion pack is done through CasperPanel, not through the old CasperLet site. This means you will need your CASPERPANEL login! |
About the Web Kiosk Pack
The Web Kiosk and Rental Vendor expansion is new in 2018, allowing you to set out a payment kiosk in conjunction with your rental units. This expansion pack also comes with NEW rental vendors, specifically for CasperLet.
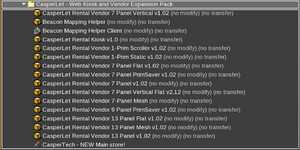
What's in the Crate?
After opening the shipping crate, you will find the following contents:
What Do I Need To Do With The Kiosk?
- Rez the shipping crate and click to unpack
- From your inventory, rez the Rental Kiosk
- Grant debit permissions - the unit will NOT function without them.
- Rename the rental kiosk, if desired
At this point, your rental kiosk will be using the default behavior, and give customers who click "browse" a complete list of your available rentals.
You are now all set, unless you want to set up some of the custom features.
Setting a Rental Profile
If you wish to limit the properties that show on THAT particular kiosk, you will need to set up a profile with rule filters. See the rental profiles page for details.
[Advanced] Embedding Listings Into Your Site
- Click the kiosk and choose "Config"
- You will arrive at the Kiosk's configuration page
- Grab the embed code and insert it into your site's listing web page.
