CasperVend 2/Quick Start
Create Your Products
- 1) Create your products for sale. If your products are items to be rezzed (like furniture or buildings), remember to set the next-owner permissions while they are rezzed inworld.
- 2) Create the pictures to be used for your vendors and upload them to SL.
(The vendors will call the image by the UUID, and there is no UUID if the image hasn't been uploaded to SL.)
- 3) Create your shipping package. You cannot use folders with CasperVend - the dropbox is only capable of sending packaged products.
(box, bag, crate, whatever you want to be seen when your customers unpack everything.)
- 4) If your items need to be rezzed anyway, simply right-click > edit > general tab > set default action to "open" on click.
- 5) If you want your shipping package to unpack on rez (or on wearing) there are third party scripts available on Marketplace or Primbay. Remember to TEST FIRST.
Package Your Products
- 1) Each product (with its respective parts) goes in one shipping package.
- 2) Add any relevant notecards, landmarks, product pictures, etc. that you want the customers to have for that product into that shipping package at this time.
- 3) Make sure each product package has its own unique name.
Unpack CasperVend Crate & Fill Your DropBox
- 1) Unpack your CasperVend shipping crate.
- 2) Rez a copy of the CasperTech DropBox (the box, not the sphere) and start putting your product packages in it.
- 3) Add your store landmark - and give it a generic name, such as "((your store name)) - Main Location"
- 4) All packages, notecards, landmarks, and any textures must ALL have unique names. This is to prevent the system from getting confused and thinking the wrong item is the product package.
Set Up Product Listings
- 1) Once everything is in, and the dropbox has finished sending data up to the website, click the DropBox and select "Admin" from the popup menu.
- 2) Let it take you to the CasperVend website where you can create your account and log in.
- 3) Click "Products" on the left column.
- 4) If you have no products set up already, the page will be empty.This is normal until you begin setting up products. (The "Products" page only shows completed listings.)
- 5) Click the green
 button
- 6) You will now be presented with the product setup screen for your individual product.
- 7) See the product options page for details on how to set up products.
- 8) To save space in your dropbox, for each product's vendor texture, simply right-click on the texture in your inworld inventory, select "copy UUID", and paste that in the UUID box within the product listing page.
- 9) Remember to click "save" at the bottom when you are done filling in product information.
- 10) Repeat for each product you want to set up at this time.
Rez Your Vendors
- 1) Choose a vendor style from the CasperVend folder and rez it out.
- 2) Grant debit permissions - the vendor will not function without them.
- 3) At this point, you will see one or more products magically appear on your inworld vendor.
- 4) The default action on click for ALL vendors is "touch" - you may, if you wish, set it to "Pay" instead. (Right-Click > Edit > "General" tab > Default Action pulldown = Pay Object).
- 5) Do not use "buy", because all "buy" will do is sell your customers the MAPPING notecard and the vendor script.
But I just want to use my existing vendor prims!
No scripting is required to use your own vendor objects!
If you are using something equivalent to the behavior of a "buy box", and just want to convert that to CasperVend, see this this flowchart for the process overview.
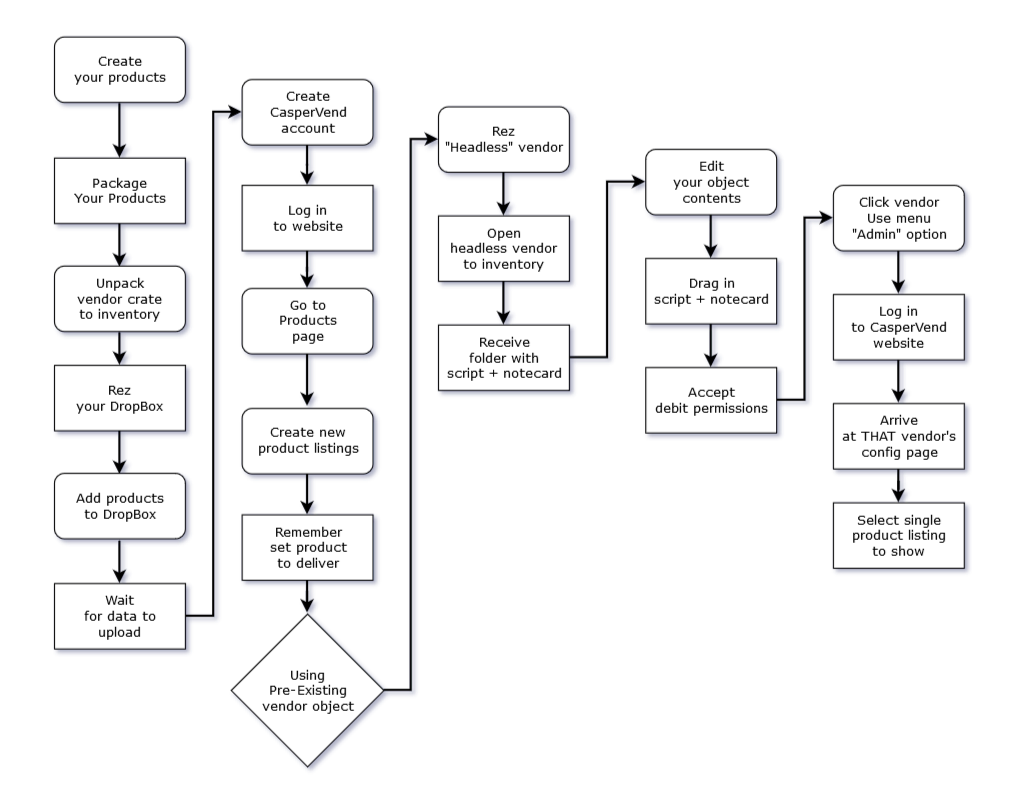
Show Specific Product(s) On Specific Vendor(s)
If you want to have only certain products showing on a specific multi-panel vendor, you will need to set up - and use - profiles.
Vendor Configuration - Profiles (Multi-Product)
Once you have your profiles set up, it's time to attach the appropriate profile to the appropriate vendor.
- 1) To get to the vendor's configuration page, click the main (usually the largest, or the most centered) panel on the vendor, and select "admin" from the popup menu.
- 2) That will take you to the specific configuration page for that vendor.
- 3) Use the "Change" link on the profile line, and use the pulldown to select the profile for that vendor.
- 4) Select the profile, and click "save".
- 5) Page will process, and the appropriate profile will appear on the multi-panel vendor.
Vendor Configuration - Single Product
- 1) To get to the vendor's configuration page, click the main (usually the largest, or the most centered) panel on the vendor, and select "admin" from the popup menu.
- 2) That will take you to the specific configuration page for that vendor.
- 3) Down at the bottom of the configuration options, there's a pulldown bar right above the column of product pictures.
- 4) Click that, and select the single product you want on that vendor.
- 5) Page will process, and the selected product will appear on the vendor inworld.
Single Item Vendor Types
All vendors - single or multi product - will rez out and by default will pull in what is called the "default" profile. However, the vendors in this list do not have arrows, and will need to be specifically told which single product you want to be shown on that vendor:
- Touch vendor
- Two-faced
- Headless
- Static
How do I....?
- ...set up affiliate vendors
- ...set your vendors for a grid-wide sale
- ...link your Marketplace via ANS (Marketplace store owner name MUST match CasperVend system owner name)
- ...keep backup dropboxes in case of sim/region failure
- ...import your sales data from other supported vending systems and prior Marketplace sales
- ...sell textures, if you have the TextureVend pack. See the TextureVend page for details.
- ...rez demos, if you have the HoloVend pack. See the holovendors page for details.
When you are ready to take full advantage of the many additional options in CasperVend, see the complete user manual.
If you need help with your CasperVend system, please see Getting Help for information on how to get in touch with us.
FAQ / Troubleshooting
- Q. "Currently logged in user has no access to configure this vendor" but they're MY vendors!
- A1. This is because the vendor used to have a different type of script that the one that is inside the vendor now.
- A2. The fix is:
- (1) Remove contents of description field, and hit return.
- (2) Shift-drag a new copy.
- (3) Grant perms on the new copy (the one left behind when dragging.)
- (4) Delete the old copy (the one you dragged.)
- (5) Use the NEW copy.
- Q. I'm setting up my vendors, but they're not booting up and I don't see the debit perm windows!
- A1. Vendors don't finish the boot process because they're waiting for you to grant debit permissions. If you are using a v3 viewer, they can accumulate behind a tiny "chicklet toast" in the corner of your screen. Check the upper right and the lower right to see if they're hanging out there waiting for you to answer.
- A2. All viewer3-style viewers actually store your popup notifications, unless you dismiss them. Over time, undismissed notifications build up - if you have too many, you may not be able to log in, OR you may not actually SEE any new notifications at all. You can see details of the problem AND the fix over on the Firestorm wiki.