WebKiosk/Rental Vendors
| This page relates to features that are NOT ACTIVE yet. This is NOT currently applicable to your rentals. |
About the New Rental Vendors
The new rental vendors allow you to show your available rentals on a dedicated CasperLet Specific vendor.
These rental vendors have a red theme instead of a blue one, and the button bar says "CasperLet".
By default, the rental vendor will pull in ALL of your available rentals. Unless you have set a specific set of images for the rental (and these are set up on a per-unit basis), the default picture pulled in will be the grid's "map tile" for the entire region.
Clicking the center panel will always pull up a teleport map to the rental. If you are the OWNER of the rental vendor, you will ALSO get the owner menu.
When the rental vendor is in use, it will rez a small beacon ball that will appear on the overhead map in the center panel to show WHERE (x and y coordinates) on the map the rental is. This beacon does NOT indicate height - only the x and y portion of the coordinates. This beacon is only temporary, and will go away after a minute or two.
Setting Up Your Vendors
- Rez out a rental vendor from inventory
- Grant Debit Perms - the rental vendor will not function without them.
- Find the "CasperLet" logo on the button bar of the rental vendor
- Click the logo
- Take the link to the CasperPanel website
- You will arrive at the configuration page for THAT vendor.
Custom Available/Rented Textures for the Vendor
 |
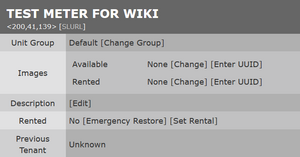
Right now, you will need to log in to CasperLet's old site for this option. You will find it on the configuration page for the specific unit, at the top of the options, but NOT on the bulk page. (This is because many landlords would prefer to customize the texture for individual rentals with a picture of the rental itself.)
Complete Configuration Screen
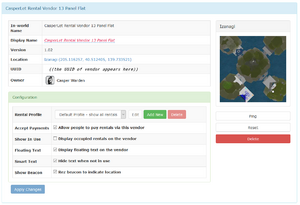
This image shows the entire configuration page for the rental vendor.
 |
Everything ABOVE the green "Configuration" bar is information about the rental vendor, the sim/region it's currently rezzed on, and the vendor owner.
Configuration Section
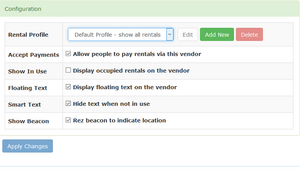
This is a closeup of the configuration section, showing the options in use by default.
 |
Rental Profile: This is where an existing rental profile is chosen, or a new one created. See the rental profiles page for more details on how to create new ones.
Accept Payments: Allows people to pay for their rentals via that vendor.
Show in Use: (off by default) Will show ALL rentals on the vendor, regardless of whether or not they're available.
Floating Text: Toggles the display of floating (hover) text on the vendor.
Smart Text: Toggles whether floating text is hidden when not in use.
Show Beacon: Toggles whether or not the beacon is rezzed to indicate location of the rental on the amp.
Customising Your Rental Vendors
Requirement - Experienced Builder
- You must know how to build a "physical" item "from scratch".
- This does not mean simply retexturing or combining full perm kit items.
- You must know how to create and edit both objects and their contents.
- You must be able to edit individual prims/objects in a linkset.
Vendor customisation is an advanced skillset that depends on you already having these experienced builder skills.
Because this is a more advanced skillset, we do not provide technical support for this process beyond the scope of this docunentation.
Customisation Overview
There are three (3) parts to customising your own rental vendor objects:
- Optional: Changing textures to suit your rental company's brand
- Required: Mapping the buttons and panels. This uses the standard vendor customisation process.
- Optional: Mapping the rezzable beacon
If you don't care about whether the beacon gives an indicator on the vendor for where the rental is on the sim, you may skip the optional beacon mapping process.
Otherwise, follow the beacon mapping section below.
Custom Textures
You will need two (2) customised textures:
- 1 named fdc1b783-b0c5-2dd2-e009-271bc781d1d3
- 1 named VENDOR_OFFLINE
The default ratio is 1:1 - square.
Button & Panel Mapping
This uses the standard vendor mapping process, the same as CasperVend does - see the CasperVend custom vendors page for details.
You may pick up a copy of the FREE CasperVend vendors to get the customisation pack that has the standard vendor mapping helper script.
Beacon Mapping
- 1) Keep your custom rental vendor object rezzed
- 2) Rez the Beacon Mapping Helper